How Whole Genome Sequencing Works: A Clear Step-by-Step Guide
When I first dove into whole genome sequencing (WGS), I thought it’d be as simple as grabbing some DNA, feeding it into a machine, and bam—a full genome pops out. Spoiler: it’s way messier than that. Imagine trying to reassemble a shredded manuscript of an ancient novel, blindfolded, with missing and tampered pages—that’s WGS in a nutshell. For a more detailed understanding, check out this comprehensive guide to genome sequencing.
If you’re curious about how the process really works, here’s a down-to-earth, step-by-step walk-through based on my own trials, errors, and hard-won lessons. I’ll keep it practical and honest—no fluff, no sugarcoating.
Step 1: DNA Extraction — Handle With Care
Everyone says “just get clean DNA,” right? But trust me, this step is fragile beyond what most guides admit.
Early on, I received a blood sample that sat on the bench overnight at room temperature because someone figured “it won’t hurt.” Wrong. The DNA degraded so badly we had to throw out the sample and start from scratch—a costly mistake in time and money (think thousands of dollars and weeks lost).
What really matters: DNA integrity is king. Use fresh samples stored cold (4°C), extract within 24 hours if possible, and pick a reliable kit like Qiagen’s DNeasy Blood & Tissue Kit.
If you skip this care, even the fanciest sequencers can’t save you. So don’t cut corners here.
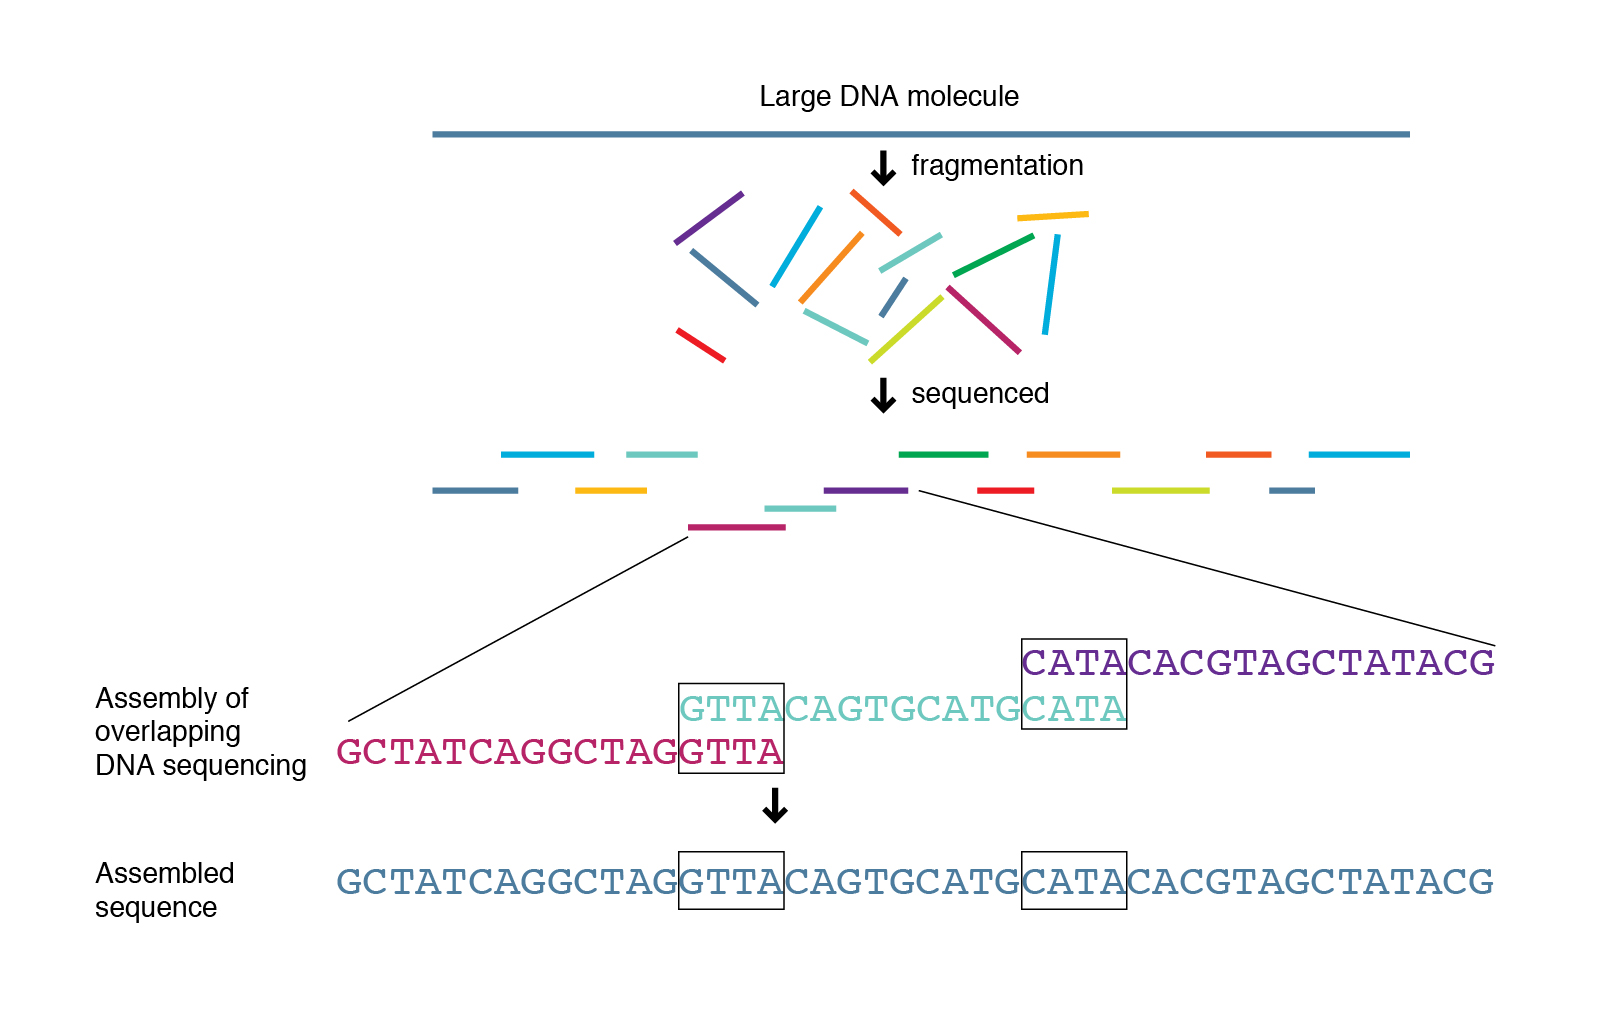
Step 2: Fragmentation — Size Shapes Your Results
The standard advice is to chop your DNA into bits between 200-600 base pairs (bp). Sounds simple enough—but the how of fragmentation changes everything.
I’ve tested enzymatic fragmentation vs. mechanical shearing (like Covaris sonication). Enzymatic methods create uneven fragment sizes—some regions get too many reads; others barely any. Mechanical shearing is louder (literally noisy equipment) but produces more uniform fragments.
Here’s a twist: if you want to detect structural variants or complex rearrangements, longer fragments around 600 bp boost your sensitivity significantly.
Pro tip: Don’t just follow the manual blindly—consider what your downstream goals are before picking fragmentation methods. For more on the challenges this step can introduce, see our article on challenges and limitations of current genome sequencing methods.
Step 3: Sequencing Platforms — Pick Your Weapon Wisely
Illumina short-read sequencing often steals the spotlight—and for good reasons like accuracy and throughput—but sometimes short reads just don’t cut it.
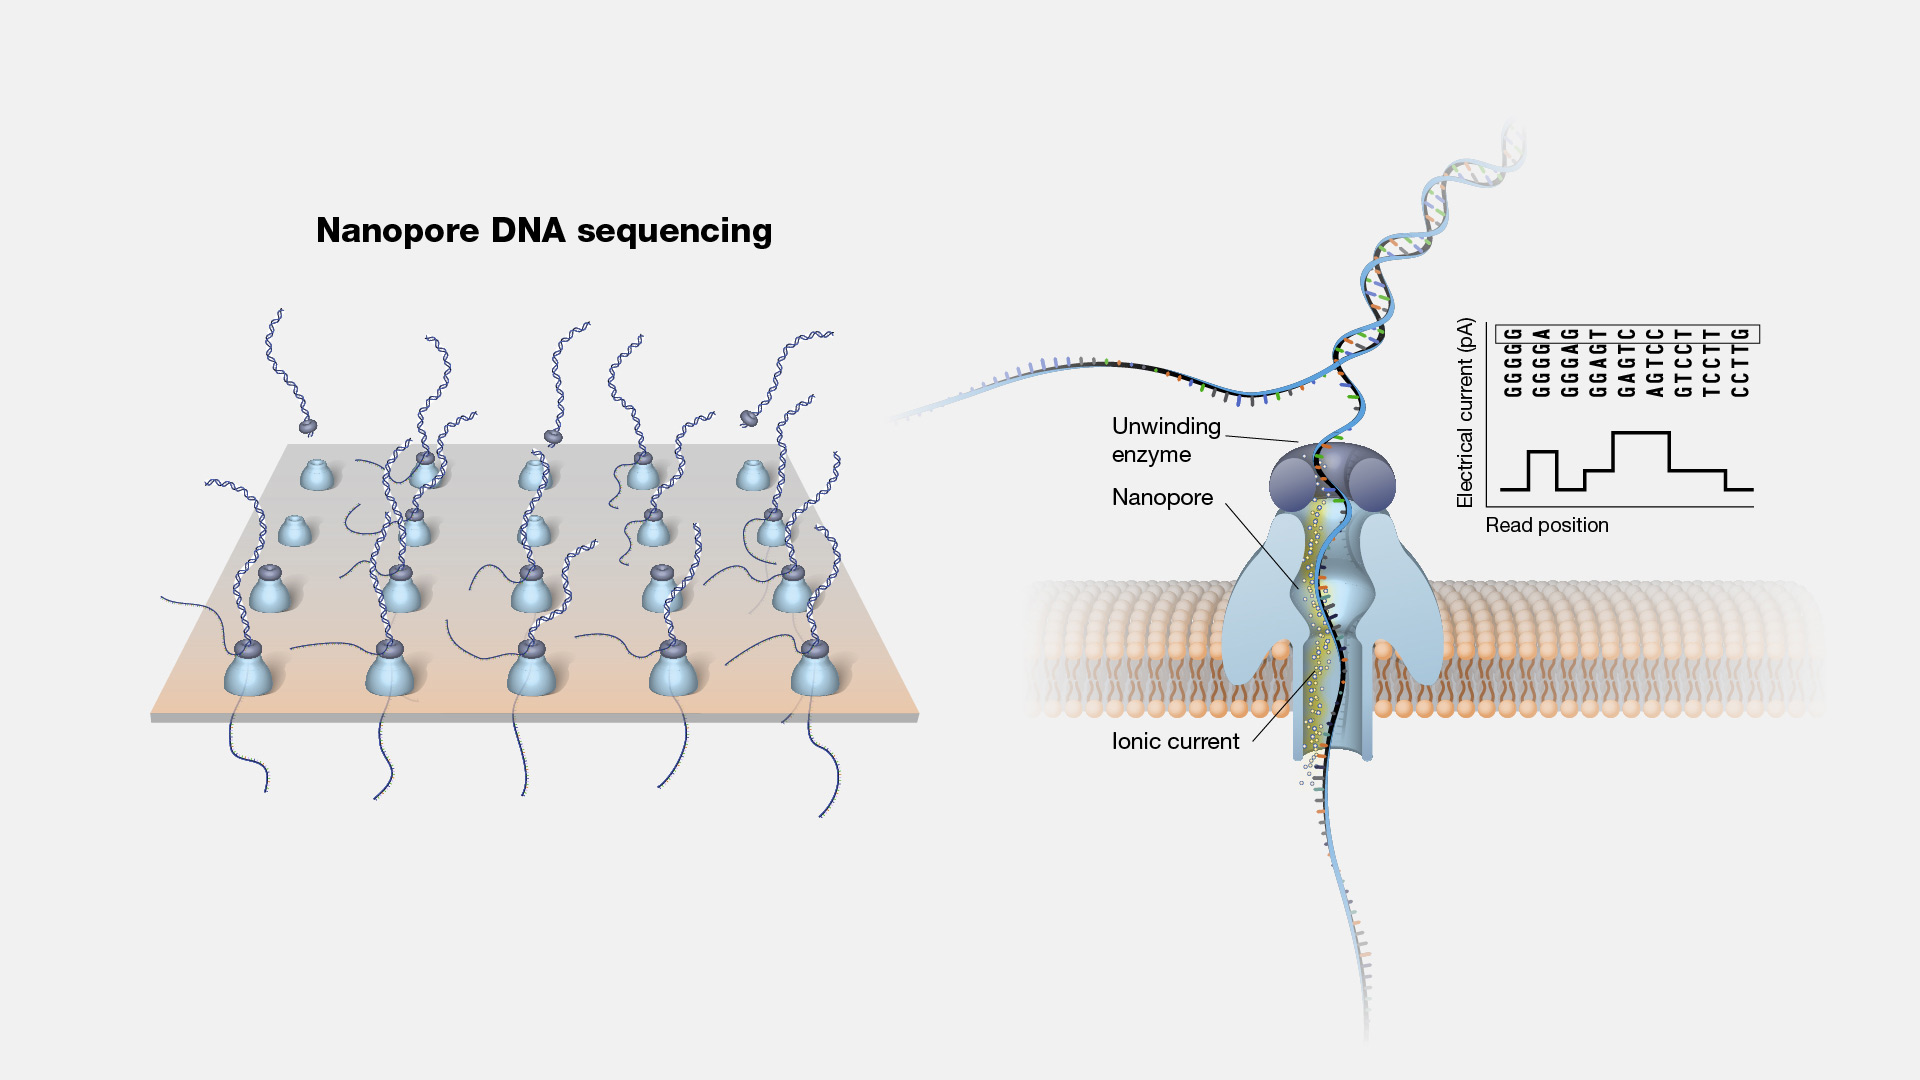
During a cancer genomics project dealing with complex rearrangements, we switched to Oxford Nanopore’s long-read technology midstream. It was messier data-wise (higher error rates), required more computational cleanup—but those longer reads unlocked repetitive regions Illumina couldn’t resolve.
So here’s my takeaway: Don’t assume one platform fits all projects. Many labs now mix short- and long-read data to play to each technology’s strengths. For more on the options available, see our article on the different types of genome sequencing technologies.
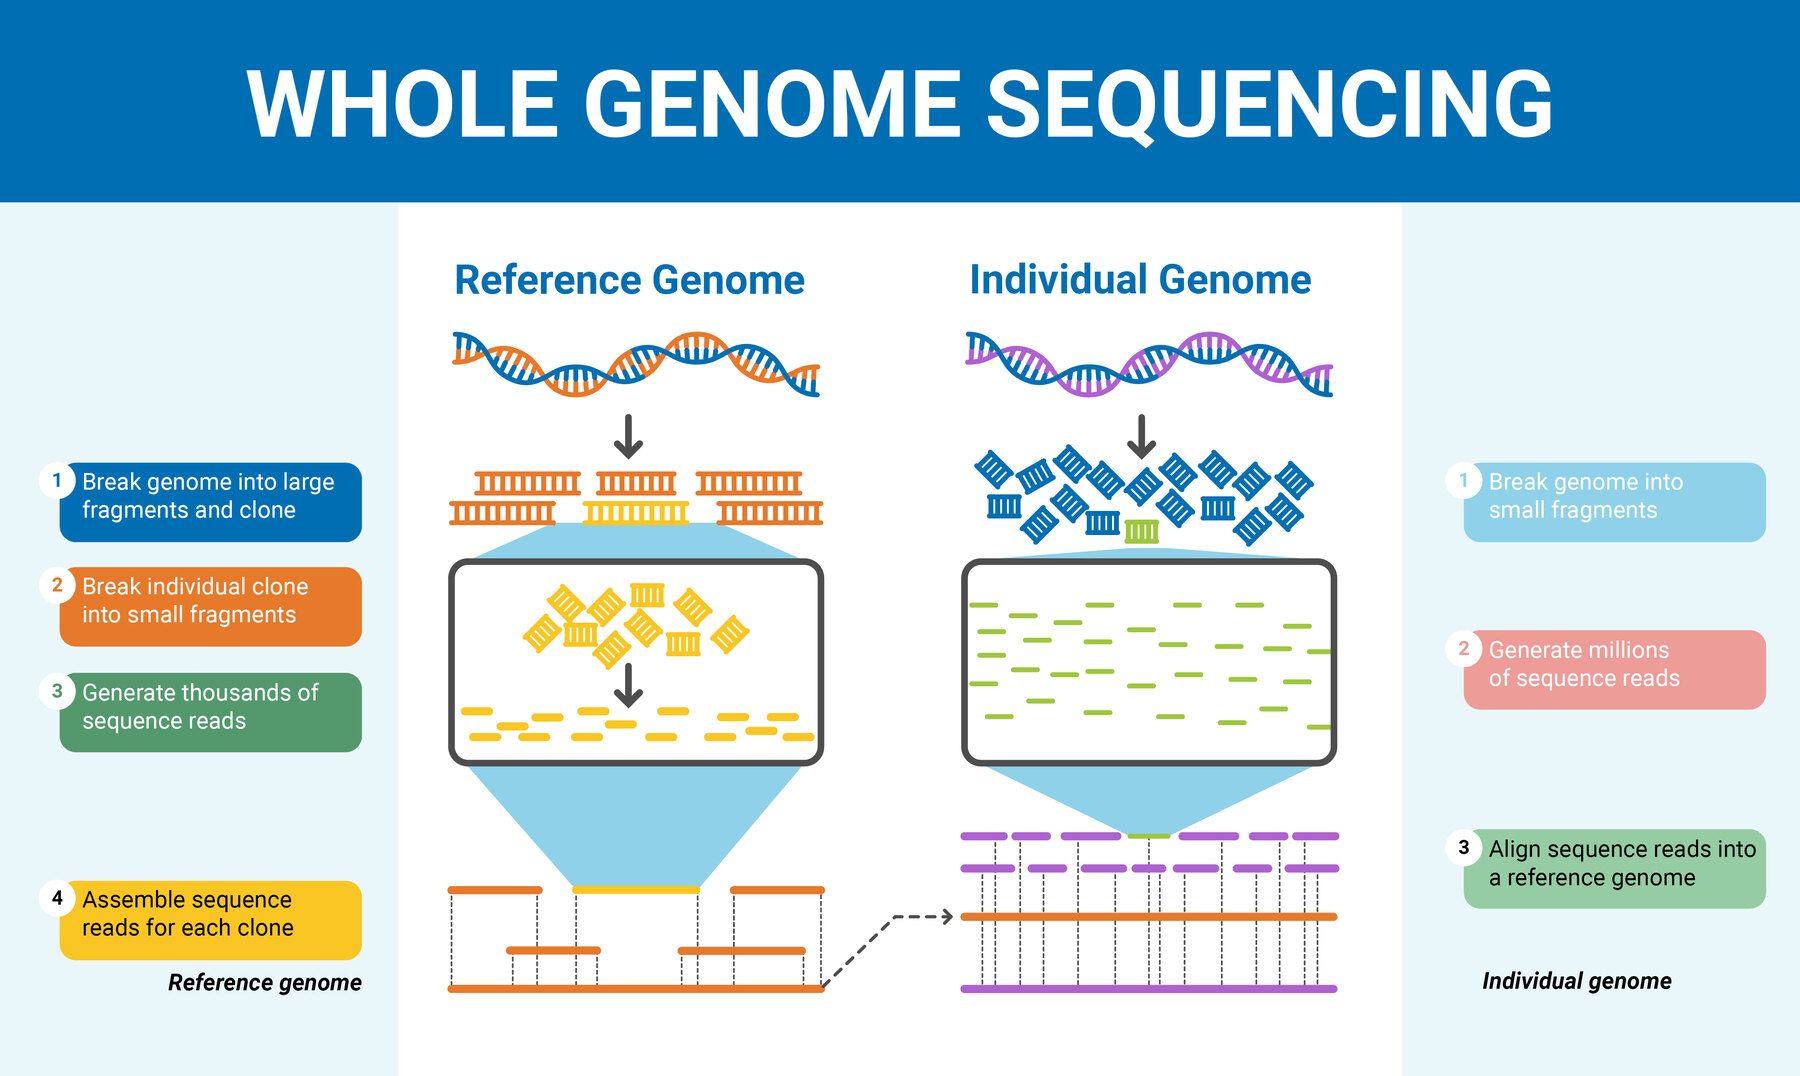
Step 4: Reassembly — Jigsaw Puzzle Without the Picture
Once you have raw reads, software tools like BWA or Bowtie2 align them against reference genomes; GATK calls variants; sounds straightforward?
Not quite.
In one CRISPR experiment during my postdoc days, skipping key quality filters led us straight into false positive territory. We celebrated apparent gene edits—until validating with Sanger sequencing showed none actually occurred.
Bottom line: pipelines help but don’t replace critical thinking. Always double-check variant calls manually or via orthogonal methods when possible. Validation isn’t optional; it can make or break your conclusions.
Step 5: Variant Calling — Expect Complexity Not Instant Answers
After assembly comes variant discovery—SNPs, indels, structural variants—and annotation.
Many newcomers expect actionable results immediately after sequencing. Reality check: you’ll often get hundreds or thousands of variants of unknown significance (VUS). Determining which ones matter involves deep database cross-referencing (ClinVar is your friend) plus expert input from genetic counselors or clinicians.
One patient sample I worked on took months of interpretation before clarifying meaningful findings—not exactly instant gratification! For tips on making sense of these results, check out our guide on how to interpret genome sequencing results.
Why You Probably Can’t DIY WGS (At Least Not Yet)
Collecting saliva at home with kits like Nebula Genomics or 23andMe? Easy peasy. Running WGS yourself? A different beast entirely.
High-end sequencers like Illumina NovaSeq cost millions upfront—not including maintenance or analysis staff salaries—and require serious bioinformatics know-how developed over years.
Even “user-friendly” platforms mask layers of complexity behind their interfaces. When consulting for a small biotech startup setting up internal sequencing, we budgeted around $1 million for hardware alone plus ongoing cloud computing fees running into thousands monthly—not pocket change by any means.
What They Don’t Tell You About Turnaround Times & Costs
Labs love to advertise 2-week turnaround times for WGS results—but trust me, quality control steps usually stretch that to 4-6 weeks minimum:
- DNA quality checks
- Achieving sufficient coverage (~30x for human genomes)
- Careful variant confirmation
Price-wise: while some centers drop sequencing below $1,000 per human genome nowadays, analysis fees can easily double that figure depending on complexity and validation needs.
One client was blindsided by surprise bills for secondary analysis and genetic counseling after ordering online—not fun!
For a deeper dive into these practical hurdles, see our article on challenges and limitations of current genome sequencing methods.
Key Takeaways Before You Start
If you’re gearing up for whole genome sequencing:
- Quality input DNA = your foundation
- Fragment size impacts what you can detect
- Choose sequencing tech based on your specific question
- Don’t trust software blindly—validate thoroughly
- Expect lots of data requiring expert interpretation
WGS isn’t magic—it’s painstaking craft layered on advanced tech. Respect every step or prepare for frustration and wasted resources.
For a complete overview of the entire genome sequencing process and its applications, see our complete overview of genome sequencing.
Final Thoughts — Embrace Complexity but Stay Curious
Sequencing my first full genome felt like entering an alien world full of chemistry glitches, computational headaches, and biological surprises—all hidden beneath polished reports you see published or sold online.
It’s tricky but thrilling once you understand what really happens behind the scenes—and why patience matters as much as technology does.
So if you want to unlock your genome’s story without getting swamped by hype or confusion:
- Start small—try targeted panels before jumping to WGS if possible
- Reach out to experienced labs or bioinformaticians early
- Take notes on every step; mistakes teach more than successes
Remember: The genome won’t spill its secrets easily—and neither should you settle for easy answers without digging deeper.
If you'd like some beginner-friendly resources or practical starter workflows tailored to your goals, just ask—I’ve got plenty of tips from my own fumbling first attempts!


